Choosing the right fixture is only one part of successful dining-room lighting. Buyers also need to consider glare, color quality, dimming, maintenance, and the room’s daily rhythm. This guide, “10 Lighting Tips for Dining Areas Buyers Need,” explores practical decisions before purchase. It covers pendant height, beam spread, table size, finish, controls, and light layering. A beautiful chandelier can still create harsh shadows on plates and uncomfortable reflections in glassware.
The U.S. Department of Energy reports that LED bulbs use up to 75% less energy and last up to 25 times longer than incandescent bulbs. That efficiency matters, especially in dining areas used every evening. However, efficiency alone does not guarantee comfort. The Illuminating Engineering Society emphasizes appropriate light levels, visual comfort, and color appearance in residential lighting practice. Buyers should therefore compare lumens, color temperature, color rendering, and dimmer compatibility. Numbers help. They do not replace seeing the fixture in a real room.
Lighting designer Randall Whitehead describes lighting as “the jewelry of the room.” His observation fits dining spaces, where a pendant often becomes the visual centerpiece. Yet the jewelry should not blind the guests. Warm, dimmable light around 2700K to 3000K usually supports relaxed meals and flattering skin tones. Small details matter: a matte diffuser, a concealed bulb, and a switch near the entrance can change the experience completely. Some recommendations may still fail in unusually bright rooms or under dark ceilings. Buyers should test samples, measure carefully, and question attractive claims before committing.
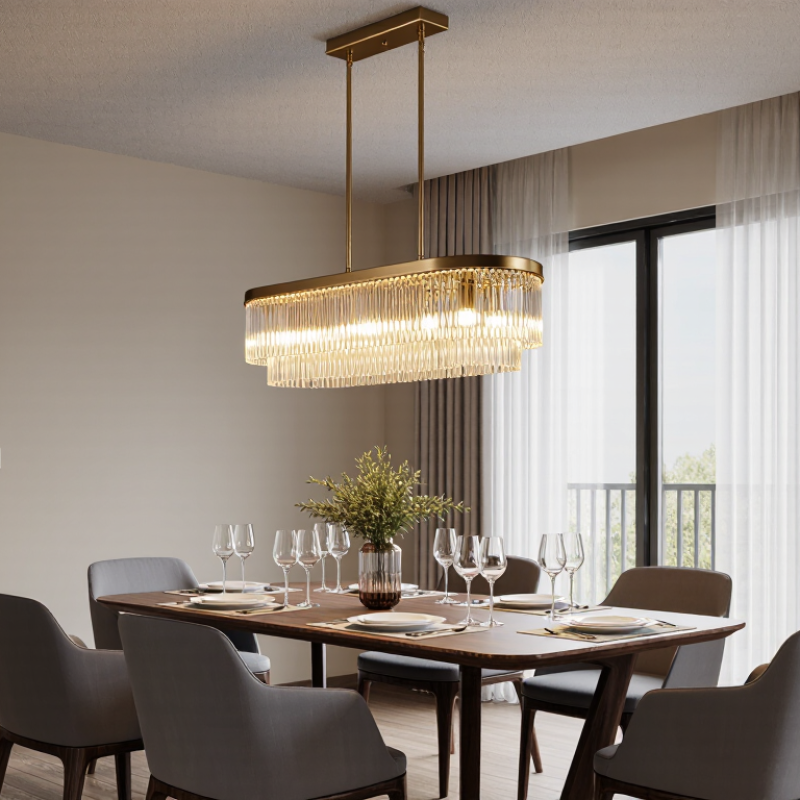
Dining area lighting should be chosen around real habits, not only appearance. Measure the table, ceiling height, and walking space before shopping. A fixture that looks balanced online may feel oversized above a narrow table. Consider how the room is used, too. Family meals need comfortable brightness, while quiet dinners need softer illumination. Natural daylight also changes the decision.
Tip: Sit at the table and look upward. The light should not shine directly into your eyes. For many dining tables, the lower edge of a hanging fixture works well when positioned about 30 to 36 inches above the tabletop. This is a useful starting point, not an absolute rule. Tall family members may need more clearance. I once preferred a lower setting for atmosphere, then noticed it blocked conversation across the table.
Tip: Check the light source before buying. Warm white light often makes wood, food, and fabric feel more inviting. A dimming function adds flexibility, especially when the room serves as a workspace. Confirm that the fixture and dimmer are compatible. This detail is easy to miss.
Also inspect cleaning needs, bulb replacement, and installation requirements. Dust gathers on upper shades and textured surfaces. Choose materials you can safely wipe. If the ceiling box is off-center, plan for an adjustable canopy or professional electrical advice. Do not assume every ceiling can support the same weight. A small oversight can become an expensive correction.
In dining rooms, fixture choice should follow table shape, ceiling height, and daily habits. A linear pendant suits long tables, while a round pendant centers a compact table naturally. For eight seats, two or three smaller pendants can spread light better than one oversized shade. I have found that visual balance matters as much as brightness. A beautiful fixture can still feel wrong when it blocks conversation.
Tips: Measure the table before shopping. Choose a fixture roughly half to two-thirds of the tabletop width. Hang it about 30 to 36 inches above the surface, then adjust after testing sightlines. Use warm, dimmable light around 2700K to 3000K for comfortable meals. Open shades reveal more light, but glass may create glare on plates and polished surfaces. Fabric shades soften reflections, although they can collect dust.
Flush mounts work well under low ceilings, but they may feel less intimate. Chandeliers add presence, yet many arms can compete with artwork or tall centerpieces. Track lighting offers flexibility, though it sometimes makes a dining room feel like a work area. Check light distribution, cleaning access, and dimmer compatibility before installation. I once prioritized appearance and ignored maintenance. The narrow shades became frustrating to clean. That mistake changed my buying checklist. Maybe yours should include it too.
| No. | Fixture Type | Best Use | Recommended Light Output | Color Temperature | Recommended CRI | Typical Mounting Guidance | Buyer Consideration |
|---|---|---|---|---|---|---|---|
| 1 | Linear Pendant | Long rectangular dining tables, dining islands, and open-plan dining zones. | 2,000–4,000 lm for a medium-to-large table | 2,700–3,000 K | 90+ preferred | Usually 75–90 cm above the tabletop. | Choose a fixture approximately 30–60 cm shorter than the table length to maintain balanced proportions and reduce visual overhang. |
| 2 | Single Pendant | Round or square tables, compact dining rooms, and smaller apartments. | 800–1,500 lm | 2,700–3,000 K | 90+ preferred | Place the fixture on the table centerline, 75–90 cm above the surface. | The shade diameter should generally be about one-half to two-thirds of the table diameter for a proportionate appearance. |
| 3 | Multi-Light Pendant | Tables that need wider visual coverage or a decorative focal point. | 1,500–3,000 lm | 2,700–3,000 K | 90+ preferred | Keep the lowest part 75–90 cm above the tabletop. | Select adjustable shades or individually positioned heads when the table is extendable or frequently rearranged. |
| 4 | Chandelier | Formal dining rooms and spaces where the ceiling fixture is the main design feature. | 1,500–3,500 lm | 2,700–3,000 K | 90+ preferred | Hang 75–90 cm above the table; verify ceiling and structural support. | For round tables, a centered round fixture works well; for rectangular tables, use a wider or linear arrangement. |
| 5 | Flush-Mount Fixture | Low ceilings, narrow dining rooms, and areas where head clearance is limited. | 1,000–2,000 lm | 2,700–3,000 K | 80+ minimum; 90+ ideal | Mounted directly against the ceiling; maintain clear walking paths below. | Use a wide diffuser for softer distribution and choose a dimmable model to change the mood from dining to entertaining. |
| 6 | Recessed Downlights | General illumination, especially when paired with a decorative centerpiece fixture. | 500–900 lm per unit | 2,700–3,000 K | 90+ preferred | Space evenly and avoid placing lights directly over seated diners where possible. | Use a wide beam for general lighting and install separate switching so the downlights can be dimmed independently from the table fixture. |
| 7 | Track or Directional Lighting | Flexible layouts, artwork illumination, and dining areas connected to living spaces. | 600–1,000 lm per adjustable head | 2,700–3,500 K | 90+ preferred | Direct beams toward the table, walls, or artwork rather than directly into eye level. | Adjustable heads help accommodate furniture changes, but glare control and beam aiming are essential for dining comfort. |
| 8 | Wall Sconces | Ambient or accent lighting along dining room walls, alcoves, and circulation areas. | 300–800 lm per fixture | 2,700–3,000 K | 80+ minimum; 90+ ideal | Install with the light source typically around eye level, adjusted to the shade design. | Use shaded or indirect designs to create comfortable ambient light without producing reflections on glossy tables or artwork. |
| 9 | Cove or Perimeter Lighting | Soft background illumination for modern dining rooms and layered lighting plans. | 1,000–2,500 lm per room zone | 2,700–3,000 K | 80+ minimum; 90+ ideal | Conceal the light source in a ceiling detail, pelmet, or architectural recess. | This low-glare layer should support, not replace, task lighting over the dining table. |
| 10 | Portable or Rechargeable Table Lamp | Flexible entertaining, outdoor dining, temporary arrangements, and mood lighting. | 100–500 lm per lamp | 2,200–3,000 K | 80+ minimum | Place where it will not obstruct plates, serving dishes, or conversation. | Prioritize stable bases, adequate battery life, low heat, spill resistance where relevant, and brightness controls. |
Dining lighting must do more than illuminate plates. Buyers should judge brightness, color temperature, and glare together. For most dining rooms, warm white light around 2700–3000K supports relaxed meals without making food appear dull. Color rendering matters. Choose a high-CRI source, ideally 90 or above, when accurate food and skin tones matter. Kelvin numbers are not enough.
A dimmer gives one fixture several useful settings. Try brighter light for cleaning, then reduce it during dinner. A layered plan works better than one powerful ceiling fitting. Combine gentle overhead light with wall lighting or concealed illumination. Aim for roughly 150–300 lux across the table, then confirm the result in the actual room. Pale walls reflect more light, while dark finishes absorb it.
Glare is easy to underestimate. Sit at every dining position and look toward the fixture. Bare bulbs, shiny shades, and exposed bright points can strain the eyes. Frosted diffusers and shaded designs usually feel calmer. Keep fixtures high enough for clear sightlines, but not so high that the table feels disconnected. I once selected a light that looked elegant in a showroom, yet felt harsh above a glossy table. The room taught me to test reflections, not just appearance. A qualified electrician should verify installation and dimmer compatibility.
A well-lit dining area depends more on placement than decoration. In my experience, a beautiful fixture can still create harsh shadows when positioned poorly.
Tip 1: Center the main light over the table, not the room.
Tip 2: Measure the table before selecting a fixture.
Tip 3: Leave about 75 centimeters between the tabletop and the lower edge of a pendant. This height protects sightlines and keeps faces visible.
Tip 4: Choose a fixture roughly half to two-thirds the table’s width.
Tip 5: Use multiple pendants over long tables for more even coverage.
Tip 6: Space them evenly, with extra care near the table ends.
Tip 7: Add dimming control for daytime meals and evening gatherings.
Tip 8: Select warm light, usually around 2700K to 3000K, for comfortable skin tones and food presentation. Test it in the actual room when possible.
Tip 9: Combine the central fixture with wall or ceiling lighting to soften dark corners.
Tip 10: Check glare from seated eye level, not only while standing. A glossy tabletop may reflect the lamp directly into diners’ eyes. That detail is easy to miss. Buyers should also consider ceiling height, table shape, and nearby windows. I once preferred a larger fixture for visual balance, but it overwhelmed the seating area. Measurements corrected my judgment. Lighting plans should be practical, adjustable, and tested before installation.
Dining-area lighting should support conversation, food, cleaning, and quiet evenings. I usually begin with three layers: ambient ceiling light, focused table light, and soft wall illumination. This prevents harsh shadows across plates and faces. Choose a dimmer for each useful layer. One control is convenient, but separate controls offer better flexibility.
Use warm light, usually around 2700K to 3000K, for a comfortable dining mood. Select high color rendering so vegetables, sauces, and wood surfaces look natural. Efficient lamps reduce energy use, although the cheapest option may not deliver the best lifetime value. Check rated hours, replacement costs, and compatibility with dimming systems. Some efficient lights still flicker when paired with poor controls. It is an easy detail to miss.
Keep pendants high enough to protect sightlines, but low enough to illuminate the table. Shield bright sources from direct eye contact. Avoid placing fixtures where chair backs or swinging doors can strike them. Heat should not collect near curtains, artwork, or other flammable materials. Damp locations need suitably rated equipment. Electrical connections should follow local requirements and use qualified installation when needed. I once favored dramatic lighting over easy maintenance; that choice became frustrating during cleaning. Select accessible fixtures, durable finishes, and parts that can be replaced. Occupancy controls can save energy in rarely used dining spaces, but they may interrupt long dinners. Test the controls at the table before committing.
Measure the table, ceiling height, walking space, and nearby windows. A fixture can look balanced online but feel oversized above a narrow table. Measure twice.
Center it over the table, not the room. This keeps light over the dining surface and supports more even coverage.
Keep its lower edge about 75 centimeters above the tabletop. This protects sightlines and keeps faces visible. Taller people may need extra clearance.
Choose a fixture about half to two-thirds of the table’s width. A large design may overwhelm the seating area, despite looking attractive.
Use several pendants with even spacing. Pay extra attention to both table ends. Poor spacing can leave darker patches.
Warm white light, around 2700K to 3000K, usually suits food, wood, fabric, and skin tones. Test the light in the actual room.
Yes, dimming helps shift from bright family meals to softer evening dinners. Check that the fixture and dimmer work together. This detail is easy to miss.
Check the light from seated eye level. A glossy tabletop may reflect light directly into diners’ eyes. Wall or ceiling lighting can soften dark corners.
Inspect the ceiling box, fixture weight, cleaning access, and bulb replacement needs. An off-center ceiling box may require an adjustable canopy or professional advice.
Do not rely only on appearance. I once chose a lower setting for atmosphere, then it blocked conversation. Practical testing changed my decision.
Choosing the right lighting for a dining area begins with understanding how the space is used, including meal times, entertaining, room size, ceiling height, and existing natural light. This guide explores practical Lighting Ideas For Dining Areas, helping buyers compare chandeliers, pendants, recessed lights, wall fixtures, and layered combinations. It explains how to select brightness and color temperature for a welcoming atmosphere while avoiding glare, harsh shadows, or visual discomfort.
The article also covers how to position and size fixtures so the table receives balanced illumination without obstructing conversation or movement. Buyers will learn why dimmers, adjustable controls, energy efficiency, easy maintenance, and electrical safety matter for long-term value. By considering both appearance and performance, homeowners can create a comfortable, functional dining environment that supports everyday meals and special gatherings while making a confident lighting investment.

Splink Lighting