Choosing lighting for an open concept home requires more than selecting attractive fixtures. One room often serves as a kitchen, dining area, living space, and workspace. Each zone needs a different visual mood, yet the entire home should feel connected. This guide introduces practical Lighting Tips For Open Concept Homes, based on professional lighting principles and real residential applications.
Randall Whitehead, a respected residential lighting designer and author, describes lighting as “the jewelry of architecture.” His observation explains why a sculptural pendant can become a focal point above a dining table, while recessed lights quietly support food preparation nearby. Effective plans usually combine ambient, task, and accent lighting. Dimmers are essential. They can soften bright kitchen light during dinner or increase visibility during cleaning. Warm color temperatures, usually around 2700K to 3000K, can make wood floors and textured fabrics feel more welcoming. High color rendering also helps food, artwork, and skin tones appear natural.
Details matter. A pendant hung too low may interrupt sightlines across the room. Excessive downlights can create glare on polished counters and television screens. Daylight changes throughout the day, so a plan that works at noon may feel flat at night. The first design is rarely perfect. It may need fewer fixtures, stronger task lighting, or better control placement. These small corrections often create a calmer and more functional home. The following sections explain how to balance scale, brightness, color, and flexibility without making the open layout feel visually crowded.
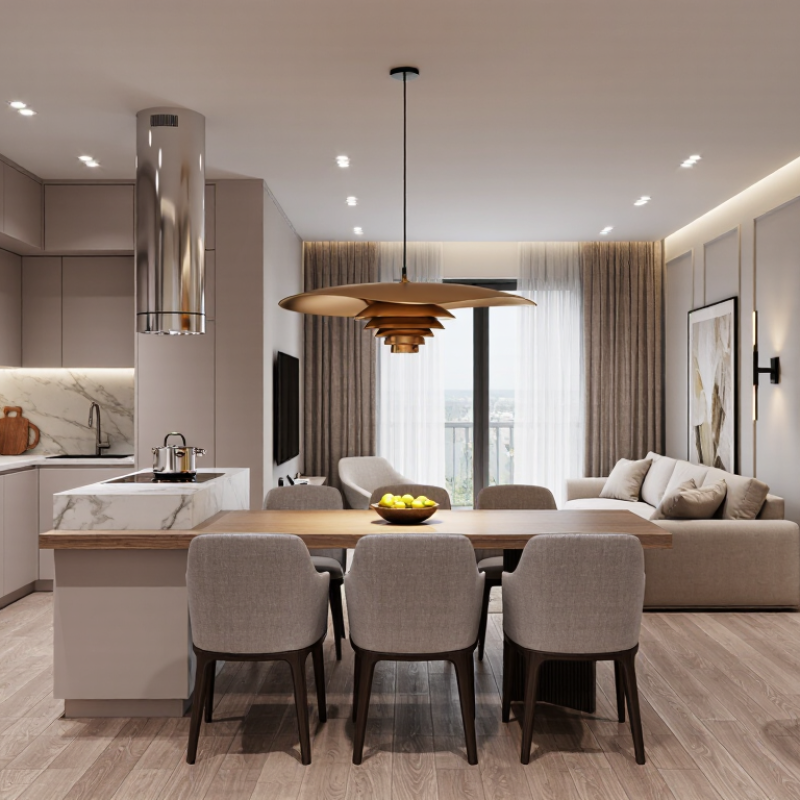
Open concept homes combine cooking, dining, relaxing, and working in one visual field. That openness creates a lighting challenge: one ceiling fixture rarely serves every activity well. The Illuminating Engineering Society recommends layered lighting, combining ambient, task, and accent sources. Ambient light supports movement, task light helps precise work, and accent light adds visual depth. In practice, a kitchen island may need focused downward lighting, while the nearby sofa benefits from softer, indirect illumination. Keep them on separate controls.
Light quality matters as much as brightness. The U.S. Department of Energy reports that LED lighting can use at least 75% less energy and last up to 25 times longer than incandescent lighting. Choose fixtures with high color rendering, especially near food, timber, artwork, and skin tones. A color temperature near 2700–3000K often feels comfortable in living areas, while 3000–4000K can support detailed kitchen tasks. Personal preference still matters.
Glossy counters, pale floors, and large windows can multiply reflections. I would test sample fixtures at different times of day before final installation. The answer may look perfect on a plan, yet feel harsh at night. The 2023 U.S. Department of Energy lighting research guidance also emphasizes controls, efficiency, and human needs. Dimmers and occupancy sensors can reduce wasted energy, but poorly placed switches still create frustration. Open plans need coordination, not merely more lamps.
Open-concept homes feel spacious, but one ceiling fixture rarely serves every activity. Map the room by function before choosing decorative fittings. Mark the cooking, dining, lounging, reading, and circulation zones on a simple floor plan.
The kitchen needs bright, even task lighting over counters and the sink. Place fixtures to reduce shadows from cabinets and your body. A dining table benefits from a lower, focused glow that keeps faces visible without shining into eyes. In the living zone, combine soft ambient light with adjustable lamps near seating. Reading corners need stronger, directed light, while walkways need gentle, continuous guidance. I have found that transitions matter most; a sudden drop in brightness can make a large room feel awkward. Still, every layout behaves differently. Test at night.
Tips: Use dimmers and separate controls for each zone. Aim light where work happens, not merely at the room’s center. Keep color temperature consistent across nearby fixtures, or the open plan may look patchy. Leave access for maintenance. Check reflections on screens, glass, and polished counters from normal sitting and standing positions. A small temporary lamp can reveal problems before wiring becomes permanent. Measure the actual space, too; plans can make furniture appear smaller than it feels.
| Functional Zone | Typical Activities | Primary Visual Tasks | Ambient Illuminance | Task Illuminance | Recommended Color Temperature | Color Rendering | Recommended Lighting Approach |
|---|---|---|---|---|---|---|---|
| Living Area | Conversation, relaxing, watching television, entertaining guests | Facial recognition, comfortable background visibility, reading, artwork viewing | 100–200 lux | 300–500 lux | 2700–3000 K | CRI 80+; CRI 90+ for artwork | Combine dimmable ceiling or wall lighting with floor or table lamps. Use accent lighting to highlight artwork, shelving, or architectural features without directing glare toward seating. |
| Kitchen Work Area | Food preparation, cooking, washing dishes, appliance use | Knife work, ingredient identification, surface cleaning, reading controls | 200–300 lux | 300–500 lux | 3000–4000 K | CRI 90+ recommended | Provide uniform ceiling lighting plus continuous under-cabinet task lighting. Position sources in front of the user where possible to reduce shadows from wall cabinets. |
| Dining Area | Eating, serving meals, conversation, occasional paperwork | Food presentation, facial visibility, table setting, reading menus | 150–250 lux | 200–300 lux | 2700–3000 K | CRI 90+ recommended | Use a dimmable pendant or chandelier centered over the table. Add indirect or perimeter lighting so the dining area remains connected to the larger open-plan space. |
| Home Office Nook | Computer work, writing, online meetings, document review | Screen readability, handwriting, keyboard use, facial illumination | 300–500 lux | 500 lux | 3000–4000 K | CRI 80+; CRI 90+ preferred | Layer overhead lighting with an adjustable desk lamp. Place the main light to the side or behind the screen to limit reflections and glare. Use blinds or shades to control daylight contrast. |
| Reading Corner | Reading books, magazines, crafts, quiet relaxation | Small-print visibility, page illumination, handwork | 100–200 lux | 300–500 lux | 2700–3500 K | CRI 90+ preferred | Use an adjustable floor or table lamp aimed at the reading surface. Choose a shaded source that illuminates the page without shining directly into the reader’s eyes. |
| Media and TV Zone | Watching films, gaming, listening to music | Screen viewing, safe movement, low-glare orientation | 50–100 lux | 100–150 lux | 2700–3000 K | CRI 80+ | Keep direct light away from the screen. Use dimmable wall, cove, or concealed lighting behind or beside the viewing area to reduce strong contrast between the screen and the room. |
| Circulation Paths | Walking between kitchen, living, dining, and entry areas | Obstacle detection, changes in floor level, wayfinding | 100–150 lux | 150–200 lux at hazards | 2700–3500 K | CRI 80+ | Use evenly spaced downlights, wall lights, or indirect perimeter lighting. Avoid isolated bright spots and maintain consistent illumination between adjacent functional zones. |
| Entry and Drop Zone | Arriving, removing shoes and coats, finding keys, greeting visitors | Facial visibility, lock and key use, storage access | 100–200 lux | 200–300 lux | 2700–3500 K | CRI 80+; CRI 90+ preferred | Combine a ceiling or pendant fixture with focused lighting at a console, mirror, coat storage, or key shelf. Ensure the entry remains visually distinct without appearing brighter than the living area. |
| Kitchen Island or Breakfast Bar | Casual meals, food preparation, homework, socializing | Food preparation, writing, eating, face-to-face communication | 200–300 lux | 300–500 lux | 3000–4000 K | CRI 90+ recommended | Use multiple pendants or a linear fixture aligned with the island. Keep fixtures high enough to preserve sightlines while providing focused, shadow-controlled illumination on the work surface. |
| Artwork and Display Areas | Viewing paintings, sculptures, bookshelves, or decorative objects | Color evaluation, texture recognition, visual emphasis | 100–200 lux | 150–300 lux | 2700–3500 K | CRI 90+ recommended | Use adjustable accent fixtures with controlled beams. Aim light across artwork rather than directly at reflective surfaces, and avoid excessive ultraviolet or heat exposure for sensitive materials. |
In an open concept home, lighting should define areas without making them feel separated. I usually begin with ambient lighting, the room’s general layer. Recessed fixtures, pendants, or a central ceiling fitting can provide even brightness across the kitchen, dining area, and living room. Use warm, consistent color temperatures throughout connected spaces. A sudden blue-white patch can make the layout feel disjointed.
Task lighting needs a more precise job. Over a kitchen island, choose fixtures that illuminate chopping and preparation without casting shadows on the work surface. A reading chair benefits from a directional floor or wall lamp placed slightly behind the reader’s shoulder. In a dining area, position the light low enough to create intimacy, but high enough to preserve clear sightlines. I have made the mistake of relying on one bright ceiling light. It solved visibility, but flattened the room.
Accent lighting adds depth and visual direction. Aim adjustable fittings at artwork, textured walls, shelving, or architectural details. In the living area, a softly lit bookcase can balance a brighter kitchen. Dimmers are essential because daylight changes quickly across an open floor plan. Test each layer at night, then revisit it during cloudy afternoons. The result may still need adjustment. Furniture moves, habits change, and a perfect lighting plan on paper can feel wrong beside an actual sofa. Avoid placing every fixture on one switch; separate controls let each zone respond to cooking, conversation, or quiet evenings.
In open-concept homes, lighting should connect zones without making every fixture identical. I usually begin with a simple plan: ambient light for circulation, task light above counters, and softer accents near seating. The IES Lighting Handbook commonly places kitchen work surfaces near 300–500 lux. That range is useful, but not absolute. Dark stone may need more light than pale quartz.
Coordinate brightness before choosing decorative fixtures. A bright kitchen beside a dim lounge can feel visually broken. Layered dimming helps balance both areas during cooking, dining, and evening conversations. ENERGY STAR reports that certified LED bulbs use at least 75% less energy and last up to 25 times longer than incandescent bulbs. Still, efficiency does not guarantee comfort. Glare from a polished island remains glare.
Color temperature also needs a shared direction. Warm white, around 2700–3000K, usually suits living rooms and dining areas. A slightly cooler 3000–3500K range can improve visual clarity in kitchens. Keep adjacent fixtures within a narrow range. The Illuminating Engineering Society’s TM-30 guidance also reminds designers to consider color fidelity, not only Kelvin ratings. Food can look dull under poor spectral quality. I once selected bright 4000K lamps for a white kitchen, and the space felt clinical at night. The safer approach is testing samples after sunset, with cabinet finishes installed. Human preference is inconsistent. That matters.
Coordinating fixtures, brightness, and color temperature across connected living spaces
Use brighter, focused lighting around countertops and islands. A neutral 3,500–4,000 K source supports food preparation and visual accuracy.
Layer ambient fixtures with dimmable pendants or wall lighting. Warm 2,700–3,000 K creates a comfortable evening atmosphere.
Keep adjacent fixtures within the same color-temperature family and use separate controls so each activity zone can be adjusted independently.
The chart shows typical target illuminance levels for residential activity zones. Actual requirements vary with room finishes, daylight, task complexity, and occupant age.
In open-concept homes, one ceiling fixture rarely serves every activity well. Layered lighting works better because each zone can respond to changing needs. Use ambient light for general visibility, task lighting over islands and desks, and accent lighting for artwork or shelving. Separate switches and dimmers give each layer independent control. During dinner, soft overhead light may feel comfortable. Later, a brighter task setting can help with cleaning.
Controls should match daily habits, not just the room’s appearance. Place switches near entrances, seating areas, and work zones. Consider occupancy sensors in pantry areas or laundry spaces. Daylight sensors can reduce artificial light near large windows, although they may need seasonal adjustment. Scene controls can combine several fixtures, but complicated settings often remain unused. Simplicity matters. A qualified electrician should confirm circuit loads, wiring, and safe installation.
Tips: Keep task lights off empty surfaces. Use warm, dimmed light in living areas after sunset. Choose controls with clear labels. Test them at night before final installation. Leave room for revision; a control plan can look perfect on paper and still feel awkward in real life. Watch for glare on screens, glossy counters, and television displays. A small table lamp or repositioned switch may solve more than an expensive upgrade.
Different activities need different light levels. Cooking, dining, reading, lounging, and walking require separate lighting approaches. One fixture rarely handles everything well.
Mark cooking, dining, seating, reading, and circulation areas on a simple floor plan. Include furniture sizes. Paper plans can make furniture look smaller than reality.
Many kitchens work well around 300–500 lux on counters. Dark stone may need more light than pale surfaces. Treat this range as guidance, not a guarantee.
Use a lower, focused glow above the table. Keep faces visible. Avoid placing bright light directly into people’s eyes.
Balance brightness between nearby areas. A bright kitchen beside a dim lounge may feel visually broken. Sudden drops in brightness feel awkward.
Warm white, around 2700–3000K, usually suits living and dining areas. Kitchens may benefit from 3000–3500K. Test samples after sunset.
Check reflections from normal sitting and standing positions. Aim fixtures at work areas, not simply the room’s center. A temporary lamp can reveal problems early.
Use separate switches and dimmers for each zone. Place controls near entrances, seating, and work areas. Keep labels clear. Complicated scenes may remain unused.
Occupancy sensors can help in pantries and laundry spaces. Daylight sensors may reduce artificial light near windows. Seasonal adjustments might still be necessary.
Test lighting at night with cabinets and finishes installed. Check brightness, glare, color, and switch locations. I once chose very cool lamps and created a clinical kitchen. My mistake.
Choosing lighting for an open concept home begins with understanding how different areas function together. Start by mapping zones such as the kitchen, dining area, living room, and workspace, then identify each area’s specific lighting needs. Use ambient lighting to provide overall illumination, task lighting for activities like cooking, reading, or working, and accent lighting to highlight architectural features or décor. This layered approach helps create a comfortable and practical atmosphere without making the entire space feel overly bright.
When selecting fixtures, coordinate their shapes, finishes, brightness levels, and color temperatures so the open layout feels visually connected. Warmer tones can make living and dining areas feel inviting, while slightly cooler light may support focus in work areas. Add dimmers, separate switches, or smart controls to adjust lighting throughout the day and suit different activities. These Lighting Tips For Open Concept Homes can improve comfort, flexibility, energy efficiency, and the overall balance of a shared living space.

Splink Lighting